

How To Set Snowboard Bindings
Snowboarders young and sometime, novice and expert, here is the commodity you've been waiting for: the secrets to mounting the bindings on your new snowboard!
Following these few easy steps volition make this process successful:
-
Preparing for the installation
-
How to install your snowboard bindings?
-
How to position your bindings?
-
Adjustments to Make to Your Bindings
one. Preparing for the installation
Gather all the parts and pieces of equipment you lot'll need, and put on your favourite playlist. Setting up your bindings is a fun way to spend time with your snowboard.
You will need
- The discs or screw inserts (what holds your binding to your board), depending on your binding setup system
- The correct number of screws supplied with your bindings
- A tape mensurate
- The correct screwdriver
- Your snowboard boots
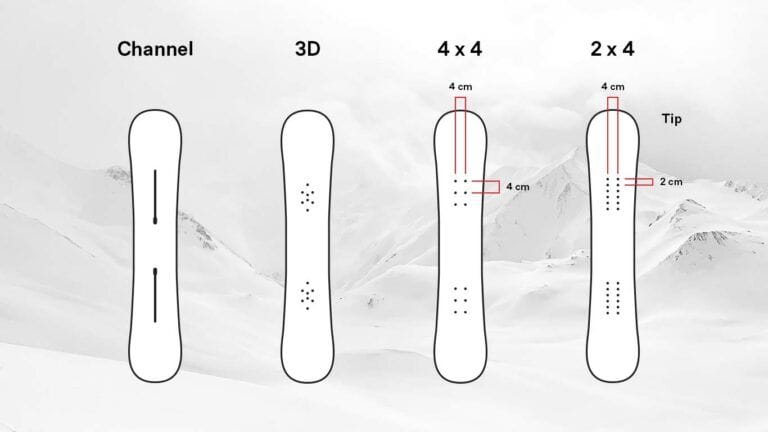
Type of setup systems
The 2X4, 4X4 and Burton 3D insert systems are screw systems , where you position the disc of the base of the bounden in front of the right screw inserts. A rails organisation, on the other hand, is a organization where y'all slide 2 screw inserts into the rail then screw the two screws located on the side of the bindings into the rail, like Burton'southward Channel system. Burton's site has some videos on how to install your bindings co-ordinate to the type of installation system.
The snowboard will necessarily have one or the other of these two systems: the rails is placed in the middle of the board along its length and the screw inserts are placed centrally in the middle of the board as well. Both systems allow yous to install the bindings and adjust their positioning in width to friction match the rider's position (wider or narrower depending on preference).
2. HOW TO INSTALL YOUR SNOWBOARD BINDINGS?
-
Gear up on a work surface that is high plenty so that you tin can mensurate and curve down easily if necessary.
-
Position the bindings on the board (more than details for the right positioning here).
-
For a disc system, align the three or iv disc holes (depending on the fixing system and the discs supplied) with the disc inserts; for a rail system, simply align the 2 screw inserts in the space on the side of the 2 fixings.)
-
Spiral to secure the fixings in the desired position on the lath.
3. HOW TO POSITION YOUR BINDINGS
There are iii important settings to recall when positioning your bindings on your snowboard: according to the front end foot, centred in relation to the width of the board, and the distance between the bindings and the angles of the bindings on the board.
1) Regular or goofy?
The first of import thing to remember! Are you lot going downhill with your right leg in front end or your left leg?
- Is your answer left? Then you are a regular rider.
Set up the left binding towards the tip of the board and the right bounden towards the tail. - Is the answer right? So you are a goofy rider.
Install the right binding towards the tip of the board and the left binding towards the tail. - Don't know the reply yet?
We recommend beginner riders employ a twin snowboard(i.e. a board that can get down on both sides without problem). This fashion, with the right settings, the rider can easily experiment with alternate between forward leg. Simply identify the bindings with a centred spread on the board and with identical angles.
2) Bindings centred in relation to the width of the board
Next, place the boot in the binding, so close the straps for better visualization. Place the bounden and so that it is as centred equally possible in relation to the width of the lath.
With Burton'due south Aqueduct organisation and EST type bindings, it is piece of cake to get a precise fit since you can simply slide the bounden until y'all get the right balance, with the front and back of the boot protruding equally from the board. You tin can employ the dial on the base of the binding to accurately conform the setting.
With other current disc systems there are three positions for the screws: either more toward the toes, centred, or more toward the heels.

Pro Tip!
Depending on your kicking model, y'all may take to choose between having the toes stick out more of your lath or the heels. If this is the instance, e'er choose the toes.
It is a question of biomechanics; the body mass is greater on the heel side and the reason for centring the bindings is to obtain the all-time possible balance.
Make certain you always measure from the heel or toe terminate of the boot that is sticking out - non the heel-cup or gas pedal of the kick.
Use a tape measure for the near accurate setting.
iii) Binding spacing
Binding spacing refers to the space between each bounden. Information technology is measured from the middle of one binding to the other. Your positioning to determine bounden spacing should be comfortable and allow for both stability and mobility. Kickoff with the legs slightly wider than shoulder width, in an athletic stance, and let for comfy bending of the hips, knees and ankles.
-
Besides wide = very stable but non very mobile.
-
Also narrow = very mobile but not very stable.
Ideally, you try the board against the reference if it is provided. This more often than not allows you lot to experience how the designers of this snowboard first imagined it. Play with the positioning and adjust according to your preferences and how it feels. It can be different from one snowboard to another.
Desire to experience descending goofy and regular of your twin snowboard? Don't forget to identify your bindings at equal distances from the center of the board.
4) Bounden angles
The angle of the bindings is another important adjustment, which can exist made from the dial on the discs or at the base of operations of other models. Dominion number one: Exercise not position the bindings at inwards angles, every bit this will force your knees to bend inward…ouch! The angle of the bindings should be determined co-ordinate to your personal condolement and of course…your riding style!
In freeride or on directional type boards, the forepart bounden will more often than not have a steeper bending than the back binding. For example, a regular rider's front bounden angle could be -18 and the back binding could be +three. In freestyle, you want versatility on both sides, either frontwards or backward, and so equal angles are favoured, -15 /+15 or -12/+12. The aim is to facilitate performance past allowing a more ambitious opinion towards the tip of the board and more directional flexing and rotation of the lower joints.
In freestyle, to be really comfortable and versatile in both directions (forward and backward or switch) we recommend equal angles for both feet (instance: -15 /+xv or -12/+12).
For all binding systems, the gauges on the base of the binding can exist relied upon to accurately adapt its setting. Continue in mind that 0 degrees is equivalent to: your feet placed in a directly line with your toes and knees aligned when bending. Starting from 0 degrees, locate the angle adjustment possibilities indicated on all binding systems and move the bindings to either side of the angle judge.
Pro Tip!
One or two degrees can brand all the deviation in comfort and performance.
Don't be afraid to experiment until you find the angles that piece of work best for you.

4. Adjustments to make on your bindings
Here are some full general tips on how to play with the fit of your bindings to optimize comfort and response.
1) Highbacks
Adaptable highbacks usually have a small knob or clip located at the back of the binding. This mechanism allows you to accommodate the inclination angle of the highback apace and without tools. Some highbacks are non adjustable and will therefore always accept the same angle of inclination.
-
Tilted or neutral
You may want to give it a few degrees of forward tilt for a more aggressive ride on the edges. Leave it in a neutral vertical position for a more relaxed ride for snowfall parks or for a descent into moguls – or any terrain that requires more than flattening of the board than edging.
-
Parallel or at same angle as the bindings
Using the two screws on each side of the binding that attach the high-back to the base of the bounden, you should attempt to position the high-back as parallel every bit possible to the edge of the snowboard past moving these screws forward or backward one at a fourth dimension. The goal is to accept a better control of the pressure level on the border on the heel side. It also allows usa to keep good mobility from left to right in the bindings.
Information technology is possible that your bindings are not completely parallel to the edge of your snowboard. This is normal, particularly if the angle of your bindings is big (known equally duck stance). Indeed, beyond -15/+15, it will exist more difficult to accept the highbacks supports completely parallel to the edge on the heel side of the board. Some people also prefer to keep the bending of the highbacks the same as the base of operations of the binding (the angle in which you take positioned your feet and into which you will bend your ankles and knees) – a matter of personal comfort.
2) Throttle pedal (commonly called gas pedal in snowboard lingo)
-
Forward or astern
This is the cream part of the base of the binding on the toe side that can be moved forward or astern to become the best possible fit for the boot. The aim is to ensure a good ability transfer to your board when y'all printing on your toes.
iii) Adjusting the straps
To adjust the straps, get-go place the boots in the bindings.
-
Centring the straps in relation to the boot
The straps should be centred on the boot. Depending on the size of the boot, the straps tin can exist fabricated larger or smaller so that the heart of the strap, generally the widest part of the strap, is positioned opposite the top of the boot (instep) for the ankle strap and the middle of the toe strap is also centred. This eliminates pressure points on the sides of the human foot or toes.
-
Height adjustment of the ankle strap
On Burton models, yous can see three height positions for the strap. The set up is done with a modest screw designed to exist used without tools. The position you cull is a matter of personal preference and your kick model – one position may exist more comfortable than another.
-
Adjusting the position of the toe strap
Adjust the position of the toe strap and tongue for optimal comfort, based on the boot, to avoid pressure level points. Simply sliding the tongue or toe strap into the toe strap slide is usually plenty to move it forward or backward on the binding.

FAQ
Q: How practise I position my bindings?
A: Simply center your bindings in relation to the width of your board, and cull the spacing and angles that accommodate your riding fashion. For more advanced tips, check out the beginning of this commodity.
Q: Which angles are the best for my bindings?
A: It all depends on your riding style, the board you cull, and your comfort level. The important thing is to be comfortable flexing your lower joints and to be able to move throughout the plow. For more information on binding angles, see the section How to position your bindings.
Q: Can I install my own bindings?
A: Yep, just follow the steps mentioned in this comprehensive article on the bailiwick.
Q: What adjustments should I make to my snowboard bindings?
A: It is possible to adjust the length and position of the straps, the tilt and alignment of the heelrests, and the gas pedal. All these adjustments are described here.
We've covered the primary steps to follow to successfully install your bindings. It'southward always a good idea, even so, to consult the manufacturer's instructions for your bindings, as some of the effectively points of a detail model may be explained in more detail.
Shoe Chaussure
Handbag Sac
Tent Tente
{"title":"","type":"drove","products":null,"single_product_link":zippo,"cta_1_text":null,"cta_2_text":null,"pros":aught,"cons":nil,"collection":null,"single_product_id":zero,"cta_1_url":null,"cta_2_url":nada,"credit":null,"limit":10,"collection_link":"https:\/\/www.distance-sports.com\/collections\/gear-ski-snowboard-snowboard"}
Source: https://altitude-blog.com/en/how-to-set-up-snowboard-bindings/
0 Response to "How To Set Snowboard Bindings"
Post a Comment